Complete Freund's Adjuvant (CFA) Instructions for Use
Share to
Product Basic Information
Full Name: Freund's Complete Adjuvant
English Name: Freund's Complete Adjuvant (FCA)
Key Ingredients: Heat-killed Mycobacterium, Paraffin Oil, Monooleate
Mycobacterium tuberculosis content: BCG content is less than 10 mg/mL; exact concentration is not disclosed.
Storage conditions: Store at 2-8°C protected from light. Do not freeze.
Shelf life: Store at 4°C, protected from light (valid for 3 years)
Use: Adjuvant for animal immunological experiments; research use only. Strictly prohibited for human or clinical applications.
Emulsification Preparation Information
1 Antigen/Sensitizer Preparation
1. Dilute the antigen to an appropriate concentration using a suitable buffer, such as saline or phosphate-buffered saline (PBS). The specific amount of antigen and injection volume should be determined based on immunization requirements.
② Determine the preparation volume based on the required injection dose and number of injection sites. Typically, the ratio of antigen to adjuvant is 1:1. The antigen dosage can also be adjusted within the range of 30–50% as needed. An antigen concentration of 30% results in a highly viscous emulsion after subsequent emulsification, whereas a concentration of 50% yields a lower viscosity, making subsequent steps such as injection easier to perform.
③ Since Mycobacterium tuberculosis may settle slightly after prolonged standing, thoroughly mix the adjuvant to resuspend the bacteria before aspiration.
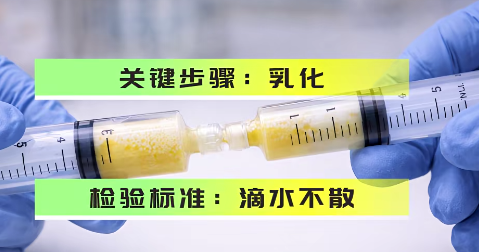
4. The adjuvant and antigen must be thoroughly mixed to ensure complete emulsification, forming a "water-in-oil" emulsion. After mixing, the emulsion will be viscous and will not spread when dropped onto the surface of saline.
2 Emulsification Steps
a. Vortex Method: Pipette a volume of Freund's adjuvant equal to that of the antigen into a centrifuge tube or container. While vortexing, add the antigen dropwise until a thick emulsion forms with complete mixing. This method is suitable for small-scale preparations.
b. Syringe Mixing Method: Draw equal volumes of Freund's adjuvant and antigen solution into two separate syringes (ideally filling no more than half the capacity of each). Connect the syringes with a narrow rubber tube, ensuring all air is expelled. First, push the antigen into the adjuvant, then alternately push the plungers until a viscous emulsion forms that is difficult to move further. This method facilitates sterile operation, minimizes antigen loss, and is suitable for small- to medium-scale preparations.
c. Stirring Method: Add the antigen and adjuvant separately to an emulsification tube. The antigen will gradually settle at the bottom, forming a distinct layer from the adjuvant. Using a stirrer, slowly mix the adjuvant into the antigen layer from top to bottom while moving downward. You will observe the mixture quickly turn milky white and become increasingly viscous. This method is suitable for small- to medium-scale preparations.
d. Mortar Method: Place an appropriate amount of adjuvant into a sterile mortar. Slowly add an equal volume of antigen solution dropwise while grinding continuously in one direction; the addition rate should be slow. Once all the antigen has been added, continue grinding for some time until a white, viscous oil-in-water emulsion is formed. This method is suitable for large-scale preparation but has the drawback of significant product loss due to emulsion adhering to the mortar walls.
e. Ultrasonication: If an ultrasonic homogenizer is available, use the ultrasonication method; however, carefully control the frequency and duration, as excessive sonication can generate free radicals that may cause unforeseen damage to antigens.
3: Emulsification Quality Verification
Water Drop Test: Add 1 drops of emulsion to water; oil droplets should remain intact without spreading.
Microscopic observation: Uniform oil-in-water structure with no visible phase separation.
Injection Test: Increased injection resistance; emulsion is pasty and non-flowing.
Workflow – GPMT Standard Operating Procedure (ISO 10993-10)
The core application of Freund's Complete Adjuvant (FCA) in sensitization testing is the Guinea Pig Maximization Test (GPMT), a classic sensitization assay recommended by ISO 10993-10, GB/T 16886.10, and OECD 406 standards.
1 Preparation Phase (Day -7 to Day 0)
Animal Ready
Use albino guinea pigs, preferably the Hartley strain, weighing 300 to 500 g and aged 5 to 8 weeks. Animals must undergo a 7-day quarantine observation period to confirm they are in good health. Shave the interscapular region (site for intradermal injection) 24 hours prior to the experiment.
Material extraction operation
Extract materials according to ISO 10993-12 standards. Use physiological saline (0.9% NaCl) as the polar solvent andCottonseed oil, sesame oil, or vegetable oilExtraction ratio is 6 cm²/mL, or performed according to the standard surface area-to-volume ratio. Extraction conditions are set at temperature 37±1°C for 24 to 72 hours under constant-temperature shaking at 60 rpm.
FCA Emulsion Preparation
Intradermal induction injection preparation involves three formulas: Solution A, Solution B, and Solution C.
Solution A (Adjuvant Control): FCA + Solvent = 1:1 (v/v)
Solution B (Sample Solution): Test sample extract (100% concentration)
Solution C (Sample + Adjuvant): Test Sample Extract + FCA + Solvent = 1:1:2 (v/v/v)
Emulsification procedure: First, vortex FCA for 2 to 3 minutes to ensure complete suspension of mycobacteria. Next, mix all components according to the specified ratio. Finally, emulsify using the double-syringe or vortex method for 10 to 15 minutes. For the water-drop test, place an emulsion droplet on cold water; it is considered acceptable if it does not spread.
II. Intradermal Induction Phase (Day 0)
Injection site marking
Mark 3 pairs of injection sites in the shaved interscapular region, for a total of 6 points with spacing between points not less than 1.5 cm. The first pair is for FCA plus solvent; the second pair is for sample extract; the third pair is for sample extract plus FCA.

Intradermal Injection Procedure
Inject a mixture of FCA and solvent 1:1 at sites A1 and A2, 2 mL per site, using strict intradermal injection to form a wheal. Inject the sample extract at sites B1 and B2, 3 mL per site. Inject a mixture of sample extract and FCA at sites C1 and C2, 4 mL per site.
Key technical points: Use 26 to 27G needles with the bevel facing up; hold the needle in place for 10 seconds after injection before withdrawal to prevent leakage; precisely control the injection volume at each site to 0.1 mL.
3. Local Preprocessing Phase (Day 6)
This phase aims to create mild skin irritation to enhance subsequent local induction effects.
Apply 10% SDS ointment to the injection site on Day 0 for a duration of 24 hours, from Day 6 to Day 7.
IV. Local Induction Phase (Day 7 to Day 9)
Patch Preparation: Cut filter paper or gauze to approximately 2 × 4 cm, apply 0.3–0.5 mL of sample extract, maintaining a concentration of 100%.
Occlusive patch application: First, remove SDS and clean the injection site. Next, apply the sample-loaded patch to the injection area. Then, secure it with an occlusive dressing such as an elastic bandage. Finally, maintain for 48±2 h, from Day 7 morning to Day 9 morning.
5. Engagement Phase (Challenge, Day 21)
Site Preparation: Select an untreated area on the side of the abdomen. Shave the area fresh and ensure there is no prior history of exposure.
Patch challenge: Soak new filter paper with 0.3 to 0.5 mL of sample extract and apply for 24 h, from Day 21 morning to Day 22 morning. Secure with a semi-occlusive dressing; avoid full occlusion to prevent excessive irritation. Note: FCA is not used during the challenge phase—only the sample extract.
VI. Results Observation and Scoring Phase (Day 22 to Day 23)
Observation time points: 24 h after patch removal is Day 22, and 48 h after patch removal is Day 23.
Magnusson-Kligman Grading Scale
Rating | Redness Severity | Edema Severity |
0 |
|
|
1 | Lightly Red | Mild |
2 | obvious erythema | Moderate edema |
3 | Crimson / Magenta | Severe edema |
4 | severe necrosis | Large-area bullae |
Result Criteria
Test group reaction score ≤ Control group reaction score → No sensitization (Pass)
Test group score ≥1 and significantly higher than control → Potential allergen (requires further evaluation)
7. Control Group Setup
Control Group | Purpose | Actions |
Negative Control (Solvent Control) | Exclude the allergenic potential of the solvent itself | Site A: FCA + solvent; Site B: Blank solvent; C site: blank solvent + FCA |
Positive Control | Verify Test System Sensitivity | 1-chloro-2,4-dinitrobenzene (DNCB) |
blank control | Exclude FCA's own response | FCA + solvent only; no sample contact |